Complete Shed Construction Guide – Free 8x12 Plans

Friday, January 31, 2025

Complete Shed Construction Guide â€" Free 8x12 Plans

Building your own shed is a rewarding project that can save you significant money and provide a valuable addition to your property. This comprehensive guide walks you through the process of constructing an 8x12 shed, complete with free plans, offering step-by-step instructions and valuable tips to ensure a successful build. Get ready to transform your outdoor space with this practical and detailed guide!

Planning Your 8x12 Shed

Before you even pick up a hammer, meticulous planning is crucial. This phase determines the success of your project. Start by carefully considering your needs. What will you store in the shed? Tools? Gardening equipment? Knowing this helps determine the necessary features. Next, secure the necessary permits from your local council. This step might seem tedious, but ignoring it can lead to costly fines. Finally, choose a suitable location on your property; ensure it’s level, accessible, and meets any local regulations regarding setbacks from property lines. We provide free 8x12 shed plans, but you might need to adjust them based on your specific requirements and local building codes.

Choosing the Right Materials

The quality of your materials directly impacts the longevity and stability of your shed. Select pressure-treated lumber for the foundation and framing to withstand the elements. Consider using a durable roofing material like asphalt shingles or metal roofing, depending on your budget and aesthetic preferences. Don’t skimp on the hardware; use galvanized screws and strong hinges to ensure your shed remains secure and weather-resistant. A detailed materials list is included in our free 8x12 shed plans to help guide you through this phase. Remember to account for potential waste and order extra materials just in case.

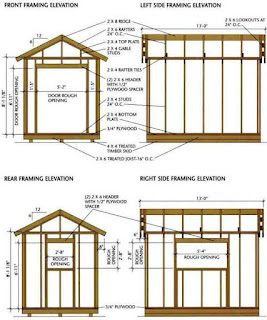
Foundation and Framing

Building a strong foundation is non-negotiable. We recommend a concrete slab for optimal stability, especially if you plan on storing heavier items. Alternatively, consider using pressure-treated 4x4 posts set in concrete footings. Our free plans detail both options. Once the foundation is complete, begin framing the walls. Use accurately cut lumber and ensure all corners are square and plumb. Accurate measurements are crucial for a sturdy and functional structure. Take your time and double-check your work at each stage.

Constructing the Walls and Roof

After completing the framing, you'll add the sheathing. This provides a solid base for the exterior cladding. Make sure to use appropriate fasteners, ensuring a tight and secure fit. Next, erect the roof trusses or rafters, ensuring they are properly aligned and secured. The roof design, detailed in our free plans, ensures efficient water runoff. Remember to check your local building codes for specific requirements regarding roof pitch and snow load capacity.

Finishing Touches and Considerations

Once the structure is complete, it's time to add the finishing touches. This includes installing the siding, roofing material, and doors. Pay close attention to the details during this phase; proper installation significantly improves the shed's weather resistance. Consider adding windows for extra light and ventilation. Don't forget the door hardware â€" secure and functional latches are vital for security. Finally, add a layer of sealant to protect the wood and extend its lifespan.

Essential Tools and Safety Precautions

Building a shed requires a range of tools. You’ll need measuring tools like tape measures and levels, cutting tools such as saws (circular saw, hand saw), and fastening tools including drills and screw guns. Safety is paramount. Wear appropriate safety gear, including safety glasses, gloves, and hearing protection, throughout the construction process. Always follow safe practices when using power tools and work with a partner if necessary, especially when lifting heavy materials.

Download Your Free 8x12 Shed Plans Now!

Ready to start building your dream shed? Download our free 8x12 shed plans now! These detailed plans provide comprehensive step-by-step instructions, diagrams, and material lists. Click the link below to access your free plans and begin your shed construction journey today! (Insert Link Here)

Remember, while these plans offer a comprehensive guide, always refer to local building codes and regulations. Happy building!

Read More..

Easy Shed Building Plans – Free Materials List Included

Easy Shed Building Plans â€" Free Materials List Included

Constructing a shed can be a rewarding DIY project, offering valuable storage space and enhancing property aesthetics. This comprehensive guide provides detailed plans for a simple yet sturdy shed, along with a free materials list, enabling even novice builders to undertake this endeavor with confidence. The focus will be on clarity and precision, guiding you through each stage of the process.

Planning and Preparation

Before commencing construction, meticulous planning is crucial for a successful outcome. This involves several key steps:

Site Selection and Preparation

Choosing the appropriate location for your shed is paramount. Consider factors such as proximity to utilities, accessibility, sunlight exposure, and drainage. Ensure the chosen site is level and free of obstructions. Leveling the ground may involve excavating and compacting the soil, potentially requiring the use of gravel or other leveling materials. Proper drainage is crucial to prevent water accumulation around the shed's foundation.

Permitting and Regulations

Check with your local authorities regarding building permits and zoning regulations before beginning construction. Requirements vary depending on your location and the size of the shed. Failing to obtain necessary permits could lead to fines or even demolition orders. Researching local codes proactively saves time and potential legal issues.

Design Considerations

While these plans offer a basic shed design, consider your specific storage needs when making adjustments. Think about the desired dimensions, door placement, window placement (if any), and overall aesthetic appeal. Larger sheds naturally require more materials and more complex construction but offer greater storage capacity. Smaller sheds are simpler to build but might limit storage options.

Materials List

The following list provides the necessary materials for constructing a 8ft x 6ft shed. Quantities may need adjusting based on specific design modifications.

  • Pressure-treated lumber:
    • 4x4 posts: 4
    • 2x4 studs: 20
    • 2x6 floor joists: 6
    • 2x4 rafters: 8
    • 2x4 for bracing: 10
    • 2x4 for door frame: 4
  • Plywood sheeting: 1 sheet (8ft x 4ft) for floor and 2 sheets (8ft x 4ft) for walls
  • Roofing felt: 1 roll
  • Shingles or other roofing material: Sufficient quantity for the roof area
  • Exterior siding: Sufficient quantity to cover the walls (e.g., vinyl, wood, metal)
  • Concrete blocks or pier blocks: 4
  • Screws: Various sizes for wood and metal connections
  • Nails: Various sizes for framing and siding
  • Door: Pre-hung exterior door (6ft tall)
  • Hinges: 3
  • Door handle and latch: 1 set
  • Gravel or other base material: As needed for leveling
  • Post-hole diggers (or equivalent): For setting the posts
  • Level: For ensuring level construction
  • Measuring tape: For accurate measurements
  • Safety glasses and work gloves: For personal protection

Construction Steps

The following steps outline the construction process. Refer to detailed diagrams and illustrations for visual assistance (not included in this text-based guide). Safety should always be your top priority.

Foundation

Begin by digging holes for the four corner posts. Use a post-hole digger or other appropriate tool. Ensure the holes are deep enough to provide stability and prevent frost heave. Set the pressure-treated 4x4 posts into the holes, ensuring they are plumb (perfectly vertical) using a level. Secure the posts with concrete or pier blocks.

Framing the Floor

Once the posts are set, install the 2x6 floor joists. These should be laid across the posts, creating a framework for the plywood flooring. Ensure the joists are level and securely fastened to the posts. Then, lay the plywood sheeting onto the joists, securing it with screws.

Wall Framing

Construct the wall frames using 2x4 studs. Measure and cut the studs to the appropriate height, creating a rectangular frame for each wall. Connect the studs using appropriate screws or nails, ensuring the corners are square. Remember to incorporate bracing for added structural strength.

Roof Framing

Next, construct the roof frame using 2x4 rafters. The rafters should be properly spaced and angled to create the desired roof pitch. Ensure the rafters are securely connected to the top plates of the wall frames. Use additional bracing to ensure roof stability.

Roofing and Siding

Apply roofing felt to the roof frame before installing shingles or your chosen roofing material. This acts as a water barrier. Then, install the exterior siding, covering the framed walls. Choose siding material that matches your aesthetic preferences and budget.

Door Installation

Install the pre-hung door in the designated opening. Use appropriate hinges and secure them firmly to both the door and the door frame. Install the door handle and latch for secure closure.

Finishing Touches

Once the main structure is complete, add finishing touches such as painting or staining the exterior and interior of the shed. Consider additional features like shelving or workbenches inside, depending on your needs. Regular maintenance will help prolong the shed's lifespan.

Disclaimer: This guide provides general instructions. Consult professional resources and building codes for detailed specifications appropriate to your location. Always prioritize safety during the construction process. The provided materials list is a guideline; actual needs may vary.

Read More..

10x16 Shed Blueprints – Free and Customizable Plans

10x16 Shed Blueprints â€" Free and Customizable Plans

Hey there, fellow shed enthusiasts! So you're dreaming of a 10x16 shed â€" a spacious haven for all your gardening tools, workshop equipment, or maybe even a cozy little artist's studio. That's fantastic! But before you dive headfirst into building, you'll want a solid plan. And guess what? You've come to the right place. This article is all about finding and using free, customizable 10x16 shed blueprints to bring your dream shed to life. Let's get started!

Why Choose a 10x16 Shed?

A 10x16 shed offers a fantastic balance of space and practicality. It's big enough to be truly useful, yet not so overwhelmingly large that the construction becomes a monumental task. This size is perfect for a variety of uses:

  • Workshop: Plenty of room for your tools, workbench, and projects.
  • Gardening Storage: Easily accommodates all your gardening equipment, fertilizers, and potting supplies.
  • Storage Shed: Ideal for storing seasonal items, outdoor furniture, sports equipment, or anything else cluttering your garage or house.
  • Home Office/Studio: With proper insulation and finishing, it can even become a cozy and productive workspace.

The versatility of a 10x16 shed is a major selling point. It can be adapted to fit your specific needs, and that's what makes finding the right blueprint crucial.

Finding Free 10x16 Shed Blueprints

Now, let's talk about the fun part â€" finding those blueprints! While you might be tempted to jump straight to paid plans, plenty of excellent free resources are available. Here are a few places to explore:

Online Shed Plan Websites

Many websites specialize in providing free shed plans. These often come with detailed diagrams, material lists, and even step-by-step instructions. However, be sure to carefully review the plans before starting your project. Some free plans might be less detailed than paid ones, and you may need to do some additional research or adjustments.

DIY Forums and Communities

Online forums and communities dedicated to DIY projects are treasure troves of information. Members often share their own shed plans, modifications, and tips. This is a great place to find inspiration and even get personalized advice from experienced builders. Just remember to be respectful and contribute to the community as well!

YouTube Tutorials

Visual learners rejoice! YouTube is packed with tutorials on building sheds of all sizes, including 10x16 sheds. These videos often provide a great overview of the construction process and can help clarify aspects of the blueprints that may be unclear. Be sure to check the comments section as well, as viewers often share helpful tips and modifications.

Customizing Your 10x16 Shed Blueprints

The beauty of free blueprints is that you can usually customize them to fit your specific requirements. This is where your creativity really shines! Think about:

Door and Window Placement

Do you need a large double door for easy access with larger equipment? Or would a single door suffice? Where would you ideally place windows for natural light and ventilation? These decisions are crucial for functionality and aesthetics.

Roof Style

Consider the climate where you'll be building the shed. A gable roof is a classic choice, offering good water runoff. A shed roof is simpler to construct, while a gambrel roof provides extra headroom inside. The best choice depends on your priorities and local weather conditions.

Material Choices

The blueprint might specify certain materials, but you have some flexibility. Choosing treated lumber for the framing will improve durability, especially if you're in a humid climate. Consider using metal roofing for added protection against the elements.

Adding Features

Do you need extra shelving, a workbench, or a loft? You can easily incorporate these features into your design. Remember to adjust the structural calculations to account for the added weight and load.

Building Your 10x16 Shed: A Step-by-Step Overview

Building a shed is a rewarding experience, but it requires careful planning and execution. Here's a general overview:

Site Preparation

Start by choosing a level location and clearing the area. Mark the foundation outline and prepare the ground for your chosen foundation type (concrete, gravel, etc.).

Foundation Construction

Build a sturdy foundation to support the weight of your shed. This ensures stability and longevity.

Framing

Following your blueprints, carefully construct the frame using pressure-treated lumber. Ensure all cuts are precise and the frame is square and plumb.

Sheathing

Install sheathing to create a solid surface for the siding. This also provides structural support.

Roofing

Install the roofing according to your chosen material and the blueprint instructions. Make sure it's properly waterproofed.

Siding and Trim

Install the siding and add finishing trim to complete the exterior. This adds both aesthetic appeal and weather protection.

Interior Finishing (Optional)

If you're planning on using the shed as a workspace or studio, consider adding insulation, drywall, and flooring.

Commonly Asked Questions

Here are some frequently asked questions about building a 10x16 shed:

  • Q: Do I need a building permit? A: Building permit requirements vary by location. Check with your local authorities before starting the project.
  • Q: What tools will I need? A: You'll need basic carpentry tools like a saw, hammer, level, measuring tape, and drill. More specialized tools might be needed depending on your chosen materials and construction methods.
  • Q: How long will it take to build? A: The construction time depends on your experience and the complexity of your chosen plan. It can range from a few weekends to several weeks.
  • Q: How much will it cost? A: The cost depends on the materials you choose and any customizations. Expect to spend anywhere from a few hundred to a couple of thousand dollars.
  • Q: Can I modify the plans significantly? A: Yes, but you should have a good understanding of structural engineering and building codes. If you're unsure, consult with a qualified professional.

Building a 10x16 shed can be a rewarding project. Remember to take your time, follow the plans carefully, and don't hesitate to ask for help when needed. Happy building!

Read More..

DIY Shed Building for Backyard Storage – Free PDF

DIY Shed Building: Your Guide to Backyard Storage Bliss (Free PDF Included!)

Dreaming of a tidy backyard and a place to stash all those garden tools, outdoor furniture, and seasonal decorations? Building your own shed is a rewarding project that combines practical skills with immense satisfaction. This guide provides a comprehensive walkthrough, empowering you to construct a sturdy, attractive shed tailored to your needs. Plus, download our free PDF plan to get started today!

Planning Your Perfect Shed

Before you even think about touching a hammer, careful planning is essential. This phase determines the success of your project. First, consider the size and dimensions of your shed. How much storage space do you realistically need? Measure your backyard carefully to determine the optimal location, ensuring you comply with any local building codes and zoning regulations. Consider factors such as sun exposure, access to utilities, and proximity to your home.

Choosing the Right Materials

The materials you choose significantly impact both the shed's durability and its aesthetic appeal. Pressure-treated lumber offers excellent resistance to rot and insect damage, making it an ideal choice for the frame. For the exterior cladding, explore options like wood siding, metal sheeting, or vinyl panels, balancing cost, maintenance requirements, and your desired look. Don't forget about the roofâ€"consider asphalt shingles for a classic look or metal roofing for longevity and weather resistance.

Essential Tools for Success

Gathering the right tools beforehand saves you time and frustration. Your arsenal should include a measuring tape, level, saw (circular saw and hand saw are recommended), drill, hammer, screwdriver, shovel, and safety glasses. Invest in quality tools; they'll make the job easier and safer. A post hole digger will also greatly simplify the foundation process if you're opting for a post-supported base.

Building Your Shed: A Step-by-Step Guide

With your plan and materials ready, it’s time to build! This section provides a simplified overview. Refer to our free PDF for detailed, illustrated instructions.

Foundation & Framing

Begin by preparing a level foundation. This could involve a concrete slab, a gravel base, or a system of pressure-treated posts set in concrete. Once the foundation is secure, erect the frame according to your plans. Precise measurements and careful assembly are crucial for a stable structure. Use appropriate fastenersâ€"construction screws are generally preferred over nails for their superior holding power.

Sheathing & Roofing

Once the frame is complete, attach the sheathing (usually plywood) to the walls, ensuring proper alignment and secure fastening. This provides a solid surface for the exterior cladding. Next, install the roofing material, following manufacturer instructions for proper overlap and sealing. Pay close attention to ensuring the roof is properly sloped to allow for efficient water runoff.

Finishing Touches

After installing the cladding, add the finishing touches. This might include installing a door, windows, and any desired hardware. Consider adding a simple paint or stain to protect the wood and enhance the shed's appearance. A final cleanup leaves you with a pristine, functional backyard storage solution. Congratulations on your accomplishment!

Download Your Free PDF Plan Now!

Ready to transform your backyard? Click here to download our comprehensive, step-by-step PDF plan, complete with detailed diagrams, material lists, and tips for success. Start building your dream shed today!

Remember safety first! Always wear appropriate safety gear, including gloves, safety glasses, and hearing protection. If you're unsure about any aspect of the project, don't hesitate to consult a qualified professional.

Read More..